Breaking News
Showing posts with label blogger widgets. Show all posts

How TO Add FaceBook Send Button To Blogger

Few day ago, face book announced and amazing new button as usual, This time it’s made specially for who loves sharing in private ,
This button features are amazing and it’s completely different from the “facebook like button”
This button allows you visitors (if they logged in FB accounts) to send your blog posts to their facebook friends, there is no need to mention how important is this and facebook for marketing your blog as we all know that facebook already sending blogs thousands of visitors every day. First of all, lets see a demo button on a blogspot blog.
Now lets learn how to do it, and i’ll list the tutorial steps to make it easy and not to make you loos your self into the details and customization,
Don’t worry, the button it self can be added only in 1 step, but for the advanced users, you can apply the additional steps.
  • 1 ) Facebook send button code.
  • 2 ) Facebook send button + Like button code.
  • 3 ) Where to put the button code.
  • 4 ) Customize it’s style ( dark or light )
  • 5 ) Advanced customizations.
1 ) Facebook send button code.
Here is the new send button code if you want to add it alone to your blogger blog.

<!--Add Facebook Send button Start templates-widgets.blogspot.com -->
<script src='http://connect.facebook.net/en_US/all.js#xfbml=1'/><fb:send colorscheme='light' expr:href='data:post.url' font='arial'/>
<!--Add Facebook Send button end templates-widgets.blogspot.com  -->
2 ) Facebook send button + Like button code.
And this is the code that you will use if you want to add like + send buttons together.

<!-- Add Facebook Send button Start templates-widgets.blogspot.com -->
<script src='http://connect.facebook.net/en_US/all.js#xfbml=1' type='text/javascript'/><fb:like colorscheme='light'  action='like'  layout='standard' expr:href='data:post.url' font='' send='true' show_faces='false' width='450'/>
<!-- Add Facebook Send button end templates-widgets.blogspot.com -->
3 ) Where to put the button code.
 Warning : Before you start applying any changes to your blogger template code, We encourage you to Backup it, by clicking on Download Full Template link.
After you decide which code you’ll use, it’s the time to choose where you’ll put it on your blog.
Actually there are two options for you to put your button at, Below the post title, Or After the post body.
Now go to your blogger account, Navigate to, Dashboard >> Design >> Edit Html .
Click on expand template widgets
And now follow the next step.
To place the code below your post title, at the top of your post,
Please find the next code in your template,

<div class='post-header-line-1'>
Or
<div class='post-header-line-1'/>
 
And paste the code after it,
Now if you want to put your button below or after your post body, Please find the following code,

<div class='post-footer'>
Or
<data:post.body/>
 
And paste the code After it.
Now click Save Template
And you are done, now go to your blog to preview your new button,
Or if you want to customize your button, or see some advanced features, please continue reading this detailed blogger tutorial.

4 ) Customize it’s style ( dark or light ).
Now if your blog template, don’t look good with the light button, Just change this code in the above codes,
colorscheme='light'
to the following code
colorscheme='dark
 
5 ) Advanced customizations.
Now What it you want to make the button only appear inside your posts and not on your blog pages / archives / labels pages,
put the following codes above and after the button codes.

<b:if cond='data:blog.pageType == &quot;item&quot;'>
The_Button_Code_Here
</b:if>
 
The following customizations for (Send + like) code. so if you piked the send only button skip this part.
How to change (like) to (recommend).
Find the following part in the button code.
action='like'
To the following
action='recommend'
hide Who liked the post and show only the number of likes.
Just find the following part at the button code.
layout='standard'
And change it to
layout='button_count'
And that’s it,
I wish i covered most of this new button customizations, and for sure if there any updates, i’ll post it here.
Read more ...

Add Twitter like widget in blogger post Footer.

Hi Bloggers Now add this special twitter widget box below all blogger post easily and get twitter followers.Its easy follow The Steps given below.


Follow simple and easy step to adding this box below every post---->>>>

* First go to your blogger Dashboard.

* Now click in design tab and edit HTML.

* Now click in small box to expand your blogger template.

* Find this code ]]</b:skin> by ctrl+f key easily.

* Copy below code and paste before ]]</b:skin>

.tweet-reaction {
background : #c0deed url('http://buildinternet.s3.amazonaws.com/theme-files/images/twitter-bg.jpg') no-repeat;
padding : 20px 15px;
margin : 5px 0 0 0;
} 

.tweet-reaction a {
float : right;
margin : -7px 0 0 0;
background : url('http://buildinternet.s3.amazonaws.com/theme-files/images/tweet-button.png') no-repeat left top;
width : 161px;
height : 34px;
overflow : hidden;
text-indent : -9999px;
} 

span.mood {
font-weight : bold;
font-size : 12px;
font-family : "Helvetica Neue", Helvetica, Arial, sans-serif;
color : #222;
} 

* Now again find this code <data:post.body/> by CTRL+F key.

* And copy below code and paste after <data:post.body/>

<div class="tweet-reaction" id="tweet-reaction">
<span class="mood">I <select id="feedback">

<option value="Liked">liked</option>
<option value="Interesting">was interested by</option>
<option value="Inspired by">was inspired by</option>
<option value="Absolutely loved">absolutely loved</option>
<option value="Didn't like">didn't like</option>
<option value="Completely disagree">completely disagreed with</option>

</select> this post.</span>
         
<a href="http://twitter.com/home?status=LikedADD HERE YOUR BLOG URL" id="tweetit" target="_blank">Tweet</a>
</div>


NOTE:- Change red color Highlighted Text with your blog URL Ok
DOnt forget to leave comments
Read more ...

Floating Share Button For Blogger

Share buttons are very popular among the bloggers, and with the popularity the presentation of the share buttons has really changed alot. Now in this post, I'll teach you how to create an Floating Share Buttons for your blog.


Floating share buttons has now been very popular as it is preferred by many big site like Mashable. As these buttons are very good looking and effective on attracting readers to share buttons, these buttons have been in demand for long.

So regarding that I've written this post to teach you how to add it to your blog. Just follow these steps:

Now open blogger.com> go to Design>go to edit html page> Check Expand Widget Templates

now search for ” ]]></b:skin> “ and add the below mentioned code just above it, do not include ” while copying the code

position:fixed;_position:absolute;bottom:0px;left:0px;clip:
inherit;_top:expression(document.documentElement.scrollTop+document.documentElement.clientHeight-this.clientHeight);_left:expression(document.documentElement.scrollLeft + document.documentElement.clientWidth – offsetWidth);}
#float_corner {padding: 5px;
border-bottom: 1px solid #e8e8e8;
now save your template. now here is the second stage of adding the code. now search for “</body>” code in your template, and add the below mentioned code just above “</body>” code. Do not add ” while copying the code

<div id=’float_corner’>
<ul>
<script type=’text/javascript’>
(function() {
var s = document.createElement(&#39;SCRIPT&#39;), s1 = document.getElementsByTagName(&#39;SCRIPT&#39;)[0];
s.type = &#39;text/javascript&#39;;
s.async = true;
s.src = &#39;http://widgets.digg.com/buttons.js&#39;;
s1.parentNode.insertBefore(s, s1);
})();
</script><a class=’DiggThisButton DiggMedium’/><br/>
<script src=’http://tweetmeme.com/i/scripts/button.js’ type=’text/javascript’/><br/>
<a class=’google-buzz-button’ data-button-style=’normal-count’ data-locale=’en_IN’ href=’http://www.google.com/buzz/post’ title=’Post on Google Buzz’/>
<script src=’http://www.google.com/buzz/api/button.js’ type=’text/javascript’/><br/>
<script badgetype=’square’ src=’http://d.yimg.com/ds/badge2.js’ type=’text/javascript’>
ARTICLEURL
</script><br/>
<a href=’http://www.facebook.com/sharer.php’ name=’fb_share’ type=’box_count’>Share</a><script src=’http://static.ak.fbcdn.net/connect.php/js/FB.Share’ type=’text/javascript’/><br/>
<a href=’http://templates-widgets.blogspot.com/2011/03/floating-share-button-for-blogger.html>Get This</a><br/>
</ul>
</div>
Now save your template and check out your blog. you can adjust the position of the widget by editing ” position:fixed;_position:absolute;bottom:0px;left:0px;clip: ” part of code.
You can change the following attributes : bottom :left
Change them to make the image appear were you like :
top left
top right
bottom left
bottom right


UPDATE 


Adding Floating share Button In sidebar for Blogger


1. Login to blogger account.

2. Go to design --> page Elements


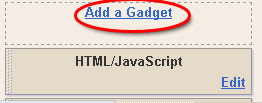
3. Click Add A Gadget.

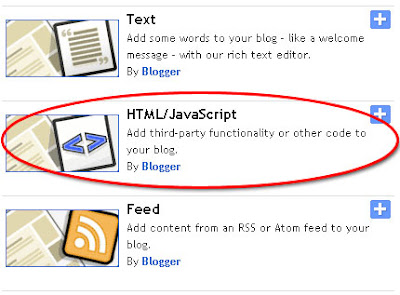
4. In Add A Gadget window, choose HTML/Javascript .
5. Copy the code below and paste it inside the content box.

<style>
#sharebar {position:fixed; bottom:15%; margin-left:-71px; float:left; border-radius:5px;-moz-border-radius:5px;-webkit-border-radius:5px;background-color:#fff;padding:0 0 2px 0;z-index:10;right:0;}
#sharebar .sbutton {float:left;clear:both;margin:5px 5px 0 5px;}
.fb_share_count_top {width:48px !important;}
.fb_share_count_top, .fb_share_count_inner {-moz-border-radius:3px;-webkit-border-radius:3px;}
.FBConnectButton_Small, .FBConnectButton_RTL_Small {width:49px !important; -moz-border-radius:3px;-webkit-border-radius:3px;}
.FBConnectButton_Small .FBConnectButton_Text {padding:2px 2px 3px !important;-moz-border-radius:3px;-webkit-border-radius:3px;font-size:8px;}
</style>
<div>
<div id="sharebar">
<a href="http://templates-widgets.blogspot.com/2011/03/floating-share-button-for-blogger.html">Source</a>

<div class="sbutton" id="fb">
<a href="http://www.facebook.com/sharer.php" name="fb_share" type="box_count">Share</a><script src="http://static.ak.fbcdn.net/connect.php/js/FB.Share" type="text/javascript">
</script>
</div>
<div class="sbutton" id="rt">
<script src="http://tweetmeme.com/i/scripts/button.js" type="text/javascript">
</script>
</div>
<div class="sbutton" id="su">
<script src="http://www.stumbleupon.com/hostedbadge.php?s=5">
</script>
</div>
<div class="sbutton" id="digg">
<script src="http://widgets.digg.com/buttons.js" type="text/javascript">
</script>
<a class="DiggThisButton DiggMedium" href=""></a>
</div>
<div class="sbutton" id="gb">
<a class="google-buzz-button" data-button-style="normal-count" href="http://www.google.com/buzz/post" title="post on google buzz">
<script src="http://www.google.com/buzz/api/button.js" type="text/javascript">
</script>
</a>

</div>
</div>
</div>

6. Save the gadget.
7. Click Save button on upper right corner.

If you like this post. Share it. Enjoy!
Read more ...

Attractive Feedburner Email Subscription box for blogger

Email Subsciption Box

<!-- Email subsciption box -->
<form id="subscribe" action="http://feedburner.google.com/fb/a/mailverify" method="post" target="popupwindow" onsubmit="window.open('http://feedburner.google.com/fb/a/mailverify?uri=Your-FeedBurner-Feed ', 'popupwindow', 'scrollbars=yes,width=550,height=520');return true"><b>Like This Blog's Posts?</b> Get the Latest of It Directly from your Inbox for Free - Enjoy your Day!<br />
<div style="text-align:center">
<input type="text" value="Enter your email address..." id="subbox" onfocus="if (this.value == &#39;Enter your email address...&#39;) {this.value = &#39;&#39;;}" onblur="if (this.value == &#39;&#39;) {this.value = &#39;Enter your email address...&#39;;}" name="email" style="width:250px;" />
<input type="hidden" value="Your-FeedBurner-Feed " name="uri" />
<input type="hidden" name="loc" value="en_US" />
<input type="submit" value="OK" id="subbutton" />
</div></form>

<div>
<center>
<table>
<tr> <td>
<a href="http://feeds.feedburner.com/Your-FeedBurner-Feed "><img src="http://feeds.feedburner.com/~fc/Your-FeedBurner-Feed ?bg=99CCFF&amp;fg=111111&amp;anim=1" height="26" width="88" style="border:0" alt="" /></a>
</td><td>
<script type="text/javascript" language="JavaScript" src="http://twittercounter.com/embed/Your-Twitter-User-Name/111111/99CCFF"></script>
</td></tr>
</table></center>
</div>

<div style="padding-left:10px;">
<table>
<tr><td><a href="http://feeds.feedburner.com/Your-FeedBurner-Feed " target="_blank" title="Subscribe To The Latest Posts"><img style="float:left; margin-right:5px; width:20px; height:20px;" src="http://img243.imageshack.us/img243/2619/10rssicon.png" /></a><a href="http://feeds.feedburner.com/Your-FeedBurner-Feed " target="_blank" title="Subscribe To The Latest Posts">Subscribe to The RSS Feed</a>
</td></tr>
<tr><td>
<a href="Your-Facebook-Page-Url" target="_blank" title="Facebook time"><img style="float:left; margin-right:5px; width:20px; height:20px;" src="http://img163.imageshack.us/img163/8637/10facebookicon.png" /></a>
<a href="Your-Facebook-Page-Url" target="_blank" title="Facebook time">Connect via Facebook</a>
</td></tr>
<tr><td>
<a href="http://twitter.com/Your-Twitter-User-Name" target="_blank" title="Twitter time"><img style="float:left; margin-right:5px; width:20px; height:20px;" src="http://img189.imageshack.us/img189/6853/10twittericon.png" /></a><a href="http://twitter.com/Your-Twitter-User-Name" target="_blank" title="Twitter time">Follow Us on Twitter</a>
</td></tr>
</table></div>

Add  feedburner email subscription box in blogger blog.

Hi friends now add this wall effect feedburner subscription box in your blogger blog with great Social network.


Follow simple step to adding this box in your blog ---->>>>>

* First go to your blogger Dashboard.

* Now click in Design tab and you are here--->>> Add new element.

* Now click in Add Gadget which is in your sidebar.

* When open new window click in HTML/javascript .

* When open new blank box copy below code and paste in blank box.


<h2>Dont Miss Another Post Connect With Us !</h2>

<center>
<form action='ADD HERE YOUR FEEDBURNER EMAIL URL' id='subscribe' method='post' onsubmit='window.open('ADD HERE YOUR FEEDBURNER EMAIL URL', 'popupwindow', 'scrollbars=yes,width=550,height=520');return true' target='popupwindow'><p> 
</p><b>Get The Latest Full Posts By Email - It's Free</b><br/><input id='subbox' name='email' onblur='if (this.value == '') {this.value = 'enter your email address';}' onfocus='if (this.value == 'enter your email address') {this.value = '';}' style='width:230px;' 
type='text' value='enter your email address'/> 
<input name='uri' type='hidden' value='blogger toolz'/> 
<input name='loc' type='hidden' value='en_us'/> 

<input id='subbutton' type='submit' value='go'/>


<p><a href='YOUR FEEDBURNER URL'><img alt='' height='26' src='ADD HERE YOUR CHICKLET BUTTON SOURCE URL'/></a></p>
<ul>
<a href='YOUR FEEDBURNER URL' target='_blank'><img alt='feedburner' height='70' src='http://santabanta.mywapblog.com/files/rss1.png' style='background:transparent;border:none;' title='subscribe to rss feed' width='70'/></a>
<a href='YOUR FACEBOOK URL' target='_blank'><img alt='facebook' height='70' src='http://santabanta.mywapblog.com/files/fb1.png' style='background:transparent;border:none;' title='find us on facebook' width='70'/></a>
<a href='YOUR TWITTER URL' target='_blank'><img alt='twitter' height='70' src='http://santabanta.mywapblog.com/files/twitter1.png' style='background:transparent;border:none;' title='follow me on twitter' width='70'/></a>
</ul>
<br/>
<div style='background: transparent url(http://4.bp.blogspot.com/_4hkuhiry_2u/tgkypieu5ai/aaaaaaaaboc/_zpvocmyhmq/post+line-1.png) no-repeat scroll center top; height: 2px; overflow: auto;'>
</div>
<div class='post-footer'>
<div class='postbox' style='padding-left:15px;color:#1b5983;background:transparent url() repeat scroll left top;line-height:20px;'>
</div>
<div style='clear: both;'></div></div></form></center>

NOTE:- Change Highlighted text in above code with your own if you have any problem comment so i will solve ok. Dont forget to leave comments

Add feed special feedburner widget box in your blogger blog.

Hi this is very effective and special feedburner email subscription box for your blogger blog add this now.


Follow simple and easy step to adding this widget box in your blogger Sidebar now--->>>>>

* First go to your blogger Dashboard.

* Now click in design tab and edit HTML.

* Now click in small box to expand your blogger template.

* Find this code ]]</b:skin> by CTRL+F key easily.

* Copy below code and paste before ]]</b:skin>

.subsboxfull{width:230px;padding-top:20px;padding-right:20px;padding-bottom:30px;padding-left:10px;color:#333;height:100px;border:1px solid #353434;background:transparent url() top center no-repeat;margin-bottom:0}
.rss-boxicon{background:url(https://blogger.googleusercontent.com/img/b/R29vZ2xl/AVvXsEikzxhi64mWOMwDrkpTrZc43hU34xyjd3jH9zSjxCLdl0BrmYEvpVae1Nrm9J5OgaVxc7YFE_UXrRvKdUFnFr1bXYmsT9BzxeTmXo-UFZn148gM2Td-JwG6tnhK_vZgdiVNr-bkpZOsO7Y/) left no-repeat;padding-left:20px;margin-right:1em;font-weight:bold}
.email-boxicon{background:url(https://blogger.googleusercontent.com/img/b/R29vZ2xl/AVvXsEicpSJAwDZS0oX33u1SrW-fu3Hj6awvwxQR40ydJF8r1lAKoQ8hKF1C8i9fQ8-XwaOzrtXSlqIXQid-U2lek9kk5GuhUo9YYFI9u_8RxUKwEx2SZYZAVjk49DR1nxZf8F8hmYS6GGGnRUM/s1600/email-box.png) left no-repeat;padding-left:20px;font-weight:bold}


* Now save your blogger template.

* Again go to your blogger DASHBOARD.

* Now click in design tab and you are here--->>> Add new element.

* Click in add Gadget which is in sidebar and when open new window Click in HTML/javascript from list.

* When open new blank box copy below code and paste in blank box.

<div class='widget-content'>
<div class='subsboxfull'>

<a href='your-twitter-url' rel='nofollow' target='_blank' title='twitter'><img src="https://blogger.googleusercontent.com/img/b/R29vZ2xl/AVvXsEg2fHBQ0VM4PglvHzEKAmt_hVSInzQ2j08yakF8s1FrkTfWxPZpkOO7mVpryoVxFmp6haY_BmF8vm9ivAmrtm8XFzhE14iooaoeTRKBd8rX77SVBqTYXG7I6aSU_CBWHJD_mt3puldtr8U/" /></a>

<a href='your-facebook-url' rel='nofollow' target='_blank' title='facebook'><img src="https://blogger.googleusercontent.com/img/b/R29vZ2xl/AVvXsEhfelPkHd786Cu2iNAdKXiNeomEglQ39WyRbIojB38VqQaZD55PogM3lDJQNLMkXTj_nx-HX81P29hok4HNpiliYdlyKrYnt1XxBsIJaK4s9L9_szhMgJXqlzqg_YLZCAAJfCpph5FTsZs/s1600/facebook--box.png" /></a>

<a href='your-delicious-url' rel='nofollow' target='_blank' title='delicious'><img src="https://blogger.googleusercontent.com/img/b/R29vZ2xl/AVvXsEhy5rZ5zJ5-F4MF8CRc8znBnJe17iNNvjBoQ_zuRCpJzpNgFzTVHjKBdgIzqxRYkz36tZRpvOcmgUGVbHTBd7NJijHVdAlzpvLP2RocdlgNr6wBj0bY8QixVw47iICE9LCZAcfUPemvqFQ/s1600/delicious-box.png" /></a>

<a href='your-stumbleupon-url' rel='nofollow' target='_blank' title='stumbleupon'><img src="https://blogger.googleusercontent.com/img/b/R29vZ2xl/AVvXsEg-4HUWe22x5lOgI7g3-2OJ9O0jorn8U9DDmpqwV9L9KMz9MS5uDIDV-PWGColBeStlNHeYEpZjMQzLqPwHfBFcRj1tPhhu_UwP_Q6_osjwUZPSjEMk7pf5VkplDeVO5bK4MB7x1tc6H1k/" /></a>

<a href='your-linkedin-url' title='linkedin'><img src="https://blogger.googleusercontent.com/img/b/R29vZ2xl/AVvXsEigaXcghiAA1fZ3trgDlKSMEPumOgtGAJwM2mnm_ITkpa72DUTuPa5ODagN8gVNazHR1yyJV60xIBj9WIxlfFAZjn8yca4-Y2tki6BsIir_dt7JmnL1LZyepAHXxjKEDlFLEqmnUX4uyNM/" /></a>

<a href='your-contact-url' title='contact'><img src="https://blogger.googleusercontent.com/img/b/R29vZ2xl/AVvXsEhI9iJxOFPmzZf7BHLbzkFRZJ6LVVmSHXA__Ee4INdOMUWI474YJRGzbxh-ouN1W0yWui8KfRRgn_0gTLCZyO2vOWVlH5M__S6h_d8_Npk82VVxK2vSSYzjliRmAlozLJIEsT32DgMmIw0/" /></a>


<form action='YOUR FEEDBURNER EMAIL URL' method='post' onsubmit='window.open(\'YOUR FEEDBURNER EMAIL URL', \'popupwindow\', \'scrollbars=yes,width=550,height=520\');return true' target='popupwindow'><p><input name="email" style="width:230px; border: 1px solid #ccc; padding: 5px;" type="text" value="Enter your email address" /></p><input name="uri" type="hidden" /><input name="loc" type="hidden" value="en_US" /></form>

<p><span><a class='rss-boxicon' href='YOUR FEEDBURNER URL' rel='nofollow' target='_blank'>RSS</a></span>
<span><a class='email-boxicon' href='YOUR FEEDBURNER EMAIL URL' rel='nofollow' target='_blank'>Email</a><span><span style="float:right;"><a href='YOUR FEEDBURNER URL' rel='nofollow'><img alt="" height="26" src="YOUR FEEDBURNER FEED COUNTER CHICKLET SOURCE URL" /></a></span></span></span></p>

</div>
</div>
<div class='clear'></div>

NOTE:- Now change Highlighted Text in above code with your own if you any problem ask me.


Read more ...

Contact Me widget for blogger


Widgetbox provides us with a free widget contact Emailer version 4 through which your visitors can send email without publishing your email.
This contact widget can be placed in the sidebar (column of the blog), or in the post if you like
The widget is under widgetbox.com , but before you copy the code you can modify the text and colors of the widget.

[1] To embed Contact EMailer form into your web page, blog etc. follow these steps Click here and go to widgetbox.com
[2] Provide Widget Settings

  •      Your Email address
  •      Web page in which Contact EMailer form Widget is to be displayed
  •      Title,Subtitle,Field captions etc
  •      Foreground and Background Colors
  •      Right to left support, if needed
  •      Image CAPTCHA suppport
  •      width and hieght of form
[3] The widget appearance will change when you are making changes to the settings4 Click on Get Widget button
[5] If you want to embed the widget in a web page, choose the embed Code option and copy the codeYou can also click on the buttons for Facebook,Blogger,Twitter,iGoogle,WordPress,my Yearbook,TypePad,Blogger Post,Netvibes,Webs,Pageflakes,Piczo,Ning,Confluence according to your requirements
[6] Paste the HTML into your webpage
[7] Test your web page with the Contact EMailer form
[8] If you are a Pro account holder in widgetbox.com, your widget will not display the about link
Read more ...

Statistics Widget for Blogger blog


What is Statistics Widget for Blogger?
Statistics Widget for Blogger will display the total number of posts and total number of comments on your blog. As of now, I have included only these two data for display. I do not see any value in displaying the total words in posts and total words in comments. I find them meaningless. If you are interested to display the total number of posts and total number of comments on your blog, please follow the instructions below.
Instructions to install Statistics Widget for Blogger
  1. Log in to your Blogger account
  2. On your Blogger Dashboard, click on the "Layout" link

    Layout Link
  3. This will take you to the "Page Elements" tab. Decide where you want to insert the statistics widget and click on the "Add a Gadget" link accordingly.

    Gadget Link
  4. Scroll down the list and find "HTML/ Javascript" and click on the "+" button

    HTML/ Javascript Gadget
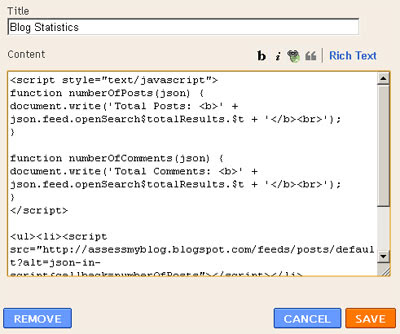
  5. This will open the "Configure HTML/ Javascript" window. In the title section, please type "Blog Statistics" or "Blog Information" or "Blog Data" or any other title as you may wish
  6. In the content section, please copy & paste the following code:
    <script style="text/javascript">

    function numberOfPosts(json) {
    document.write('Total Posts: <b>' + json.feed.openSearch$totalResults.$t + '</b><br>');
    }

    function numberOfComments(json) {
    document.write('Total Comments: <b>' + json.feed.openSearch$totalResults.$t + '</b><br>');
    }

    </script>

    <ul><li><script src="http://yourblog.blogspot.com/feeds/posts/default?alt=json-in-script&callback=numberOfPosts"></script></li>

    <li><script src="http://yourblog.blogspot.com/feeds/comments/default?alt=json-in-script&callback=numberOfComments"></script></li></ul>

    <span style="font-size:75%;"><a href="http://templates-widgets.blogspot.com/" target="_blank">Widgets for Blogger</a></span>
  7. Remember to replace the text in bold "yourblog" with your blog address. Take note to replace it in two locations.
  8. Your window should look like the image below.

    Configure HTML Gadget
  9. I have a link back to my blog at the bottom. You are free to remove the credit, if you don't like it
  10. Click on "Save" button at the bottom right hand corner

That's it. You have created a widget to display the number of posts and number of comments on your blog. Please contact me if you have any doubts or you face any problems with the widget.
Read more ...

add Follow me Badge for your site/blog


This badge calls your users to start following your twitter account.
Twitter has proven itself to be a great communication channel with your site visitors.
This badge can be installed almost on any site. Just customize it a bit and take the code.

Read more ...

New-numbered Page Navigation widgets for blogger/blog

Page Navigation is a really awesome and long awaited feature. You might have seen numbered page navigation on many wordpress blogs(wp-pagenavi by Lester Chan). Muhammad Rias of Techie Blogger had already developed a page navigation system for blogger.It really was an awesome trick which was made at a time when nobody could even think of implementing it on blogger.It had some minor bugs and now Abu Farhan has perfected it and he has now given us the perfect page navigation solution.Here is a little screenshot of what this is all about. blogger page navigation
When you use this hack,you will see this kind of navigation on your blog’s home page and label pages(needs little customization).
Read more ...

Add blogger tag cloud widgets by label/categories

This widget is perfect for blogspot users who desire a simple tag cloud for their Categories. The Labels Cloud can easily be implemented within the sidebar of your blog and will match your template wonderfully.

Steps for Implementation
Step 1: Back it Up
Always make sure to back up your Blogger Template before doing anything else!

Step 2: The Labels Gadget
Make sure that you have the Labels Page Element installed. If you haven't already...

   1. Go to Layout >Page Elements .
   2. Click "Add a Gadget" and then add the "Labels" gadget.

Step 3: Locating the "Old Code"

   1. Now go to Layout >Edit HTML
   2. Make sure that the "Expand Widgets Template" box is unchecked.
   3. Now we need to search for the code that looks like this.

          <b:widget id='Label1' locked='false' title='Tags' type='Label'/>

      Your code may look a little different. So try using your browser's search tool to find type='Label'.

Step 4: Replacing the "Old Code" with the "New Code"

   1. Once you've located type='Label', remove the whole line of code that looks just like the code mentioned in part 3 of step 3.
   2. Replace this code that you've just deleted with the code below:

          /*
          Distributed by laxman kafle at templates-widgets.blogspot.com
          */ <b:widget id='Label1' locked='false' title='Tags' type='Label'>
          <b:includable id='main'>
          <b:if cond='data:title'>
          <h2><data:title/></h2>
          </b:if>
          <div class='widget-content' style='text-align: justify;'>
          <script type='text/javascript'>
          /*
          Simple Blogger Tag Cloud Widget
          by Raymond May Jr.
          http://www.compender.com
          Released to the Public Domain
          */

          //Settings / Variables
          var max = 150; //max css size (in percent)
          var min = 70; //min css size (in percent)
          var showCount = false;  // show counts? true for yes, false for no
          var minCount = 1;  // what is the minimum count for a tag to be shown? 1 for all


          //Begin code:
          var range = max - min;

          //Build label Array
          var labels = new Array();
          <b:loop values='data:labels' var='label'>
          labels.push(&quot;<data:label.name/>&quot;);
          </b:loop>

          //URLs
          var urls = new Array();
          <b:loop values='data:labels' var='label'>
          urls.push(&quot;<data:label.url/>&quot;);
          </b:loop>

          //Counts
          var counts = new Array();
          <b:loop values='data:labels' var='label'>
          counts.push(&quot;<data:label.count/>&quot;);
          </b:loop>

          //Number sort funtion (high to low)
          function sortNumber(a, b)
          {
          return b - a;
          }

          //Make an independant copy of counts for sorting
          var sorted = counts.slice();

          //Find the largest tag count
          var most = sorted.sort(sortNumber)[0];

          //Begin HTML output
          for (x in labels)
          {
          if(x != &quot;peek&quot; &amp;&amp; x != &quot;forEach&quot; &amp;&amp; counts[x] >= minCount)
          {
          //Calculate textSize
          var textSize = min + Math.floor((counts[x]/most) * range);
          //Show counts?
          if(showCount)
          {
          var count = &quot;(&quot; + counts[x] + &quot;)&quot;;
          }else{
          var count = &quot;&quot;;
          }
          //Output
          document.write(&quot;<span style='font-size:&quot; + textSize + &quot;%'><a href='&quot; + urls[x] + &quot;' style='text-decoration:none;'>&quot; + labels[x] + count + &quot;</a></span> &quot; );
          }
          }
          </script>
          <br/>
          <span style="font-size:80%;float:right;">Powered by <a href="http://www.templates-widgets.blogspot.com">Blogger Widgets</a></span>
          </div>
          </b:includable>
          </b:widget>


Step 5: Previewing the New Tag Cloud
Before saving the template make sure to click preview. The new tag cloud should now be visible. If not, make sure that you've completed all the steps correctly.
Read more ...

Arrange your Comments Avatar with CSS in blogger

t's been quite long since I made a post in this blog. I had a lot of problems with my net connection(still not fixed) and modem. Still, I found some time today, to post about a new feature introduced by blogger, that is, avatars on blogger comments. Blogger is introducing new features daily on account of its 10th birthday celebration. Every blogger wanted to display avatars like the ones,
Read more ...

Automatic read more with image hacked for blogger

Automatic read more with image hacked for blogger:You have to specify the number of characters after which the post will be truncated. If you select it as 500, then all your posts in the home page will show only first 500 characters.
And moreover this hack has already been modified to show the first image from the post, as a thumbnail along with the truncated post.

I called this hack as Automatic read more with image hacked for blogger, because through this hack you not only add the "Read More" tag to your posts, but it also optimizes your "Archive pages" (Feb 2008, Oct 2008, etc.) for search engines and
Read more ...

New-Add social bookmarks buttons in blogger sidebar

place social bookmark buttons in the sidebar, footer and below each post in a Blogger Blogspot blog. This is a social bookmarking script for individual buttons or icons rather than the Add This all-in-one solution that I have previously written about. These free social bookmark buttons will encourage social bookmarking SEO by having your visitors save their favorite content and hopefully share it on social media sites such as Digg, Technorati and Stumble Upon thereby helping to grow your blog traffic.

I personally prefer to use an Add This social bookmark button because individual buttons can create a cluttered busy look. However, I also realize that the Add This social bookmarking button is not necessarily that recognizable to visitors who may have otherwise bookmarked your pages had the button been more recognizable to them.
Read more ...

Best-related posts by labels or categories for blogger

Blogger/ Blogspot widget “ best Related posts by categories” shows related posts according to user defined categories at the end of each post. Another widget “best Related posts widget for blogger” displays only a list of related posts but this widget shows posts under different labels, categories or tags. You can display desired posts under desired categories and also can specify the number of posts to display in your blogger blog. Needless to say, this widget will help your blog users to explore more related posts under the categories they are interested in.
Follow the specific instructions below to add this
Read more ...

recent posts widgets with image included for blogger

Are you tired of using the recent posts widget for blogger that only displays recent post Titles with links? Here’s one new widget that displays the recent posts along with the thumbnail included in your post. Isn’t it interesting widget? Of course it is. Well, recent posts widget is the most have widget for your blog and this thumb nailed widget is more interactive to showcase your recent posts. I am sure you gonna drive some more traffic through this widget by displaying your recent posts with adjacent to the thumbnails. One more interesting thing is that if you have added recent posts widget through that RSS
Read more ...

share blog from your blog navbar


Share Posts from your Blogger NavBarI guess most of you have removed the NavBar from your Blogger Template if you are using some custom versions of the template for your blog. Well, its now time to get back the NavBar again in your template. But not really if you don’t like to use this new feature of Blogger, which allows you to share posts directly from the NavBar. NavBar of the Blogger starting from august 27, 09, includes a "SHARE" button. This button will help you to share posts to popular social networking sites and even e-mail them directly. Social
Read more ...

page navigator widgets for blogger

Page Navigation is a really awesome and long awaited feature. You might have seen numbered page navigation on many wordpress blogs(wp-pagenavi by Lester Chan). Muhammad Rias of Techie Blogger had already developed a page navigation system for blogger.It really was an awesome trick which was made at a time when nobody could even think of implementing it on blogger.It had some minor bugs and now Abu Farhan has perfected it and he has now given us the perfect page navigation solution.Here is a little screenshot of what this is all about.  


Read more ...

Display Posts as Headlines in blogger


1.Login to blogger dashboard-->Layout > Page Elements

2.Click on 'Add a Gadget'.

3.Select 'HTML/Javascript' and add the code given below and click save.
plz put the code carefully
Read more ...

add link to the post widgets for blogger

Do you like to add "Link To This Post Widget" under your blog post?This will help you to increase your site's backlinks for better SEO.So if you interested to add this useful widget to your blogspot blog follow the simple steps below.

1.Log in to your dashboard--> layout- -> Edit HTML

2.Click on "Expand Widget Tetemplates-widgets.blogspot.commplates"
Read more ...

new-popular post widget /without comments count


login to blogger
1.Login to your dashboard--> layout- ->Page Elements

2.Click on 'Add a Gadget' on the sidebar.

3.Select 'HTML/Javascript' and add the code given below and click save
.


Read more ...

Add Comment Feeds widgets For Individual Blogger Posts

This is very useful for your visitors to Subscribe to comments for the special blog posts of your blogger blog.

1.Log in to your dashboard--> layout- -> Edit HTML

2.Click on "Expand Widget Templates"

3.Scroll down to where you see this:
Read more ...
Designed By GP