Breaking News
Showing posts with label blogging tools. Show all posts

How TO Add FaceBook Send Button To Blogger

Few day ago, face book announced and amazing new button as usual, This time it’s made specially for who loves sharing in private ,
This button features are amazing and it’s completely different from the “facebook like button”
This button allows you visitors (if they logged in FB accounts) to send your blog posts to their facebook friends, there is no need to mention how important is this and facebook for marketing your blog as we all know that facebook already sending blogs thousands of visitors every day. First of all, lets see a demo button on a blogspot blog.
Now lets learn how to do it, and i’ll list the tutorial steps to make it easy and not to make you loos your self into the details and customization,
Don’t worry, the button it self can be added only in 1 step, but for the advanced users, you can apply the additional steps.
  • 1 ) Facebook send button code.
  • 2 ) Facebook send button + Like button code.
  • 3 ) Where to put the button code.
  • 4 ) Customize it’s style ( dark or light )
  • 5 ) Advanced customizations.
1 ) Facebook send button code.
Here is the new send button code if you want to add it alone to your blogger blog.

<!--Add Facebook Send button Start templates-widgets.blogspot.com -->
<script src='http://connect.facebook.net/en_US/all.js#xfbml=1'/><fb:send colorscheme='light' expr:href='data:post.url' font='arial'/>
<!--Add Facebook Send button end templates-widgets.blogspot.com  -->
2 ) Facebook send button + Like button code.
And this is the code that you will use if you want to add like + send buttons together.

<!-- Add Facebook Send button Start templates-widgets.blogspot.com -->
<script src='http://connect.facebook.net/en_US/all.js#xfbml=1' type='text/javascript'/><fb:like colorscheme='light'  action='like'  layout='standard' expr:href='data:post.url' font='' send='true' show_faces='false' width='450'/>
<!-- Add Facebook Send button end templates-widgets.blogspot.com -->
3 ) Where to put the button code.
 Warning : Before you start applying any changes to your blogger template code, We encourage you to Backup it, by clicking on Download Full Template link.
After you decide which code you’ll use, it’s the time to choose where you’ll put it on your blog.
Actually there are two options for you to put your button at, Below the post title, Or After the post body.
Now go to your blogger account, Navigate to, Dashboard >> Design >> Edit Html .
Click on expand template widgets
And now follow the next step.
To place the code below your post title, at the top of your post,
Please find the next code in your template,

<div class='post-header-line-1'>
Or
<div class='post-header-line-1'/>
 
And paste the code after it,
Now if you want to put your button below or after your post body, Please find the following code,

<div class='post-footer'>
Or
<data:post.body/>
 
And paste the code After it.
Now click Save Template
And you are done, now go to your blog to preview your new button,
Or if you want to customize your button, or see some advanced features, please continue reading this detailed blogger tutorial.

4 ) Customize it’s style ( dark or light ).
Now if your blog template, don’t look good with the light button, Just change this code in the above codes,
colorscheme='light'
to the following code
colorscheme='dark
 
5 ) Advanced customizations.
Now What it you want to make the button only appear inside your posts and not on your blog pages / archives / labels pages,
put the following codes above and after the button codes.

<b:if cond='data:blog.pageType == &quot;item&quot;'>
The_Button_Code_Here
</b:if>
 
The following customizations for (Send + like) code. so if you piked the send only button skip this part.
How to change (like) to (recommend).
Find the following part in the button code.
action='like'
To the following
action='recommend'
hide Who liked the post and show only the number of likes.
Just find the following part at the button code.
layout='standard'
And change it to
layout='button_count'
And that’s it,
I wish i covered most of this new button customizations, and for sure if there any updates, i’ll post it here.
Read more ...

Surprise New Facebook Comments Box For Blogger

What is the new facebook comments features.
  • Threaded comments : reply to comments.
  • User network : now it’s displaying the comment author not only name, but his profile info as well
  • Permalink to specific comments : Permalinks have now been assigned to each comment so people can share links and be directed to specific comments.
  • Notifications : sent to users will also go to the permalink, making it easier to respond. For example, clicking on the notification below will take you to the permalink of the original comment.
  • 2 Color schemes, regular light, and the new dark colors.
now let’s do it, don’t worry, i know that must of you tried to add it to blogger blogs, with no result, but today you’ll see how to add it in really easy steps and it’s 100% working. but please be careful and pay attention for all the details.
This tutorial is updated.
Step 1. Disable Default Comments.
The first thing you should do it to disable blogger default comments. because you don’t want to have 2 comments forms.
go to your blogger account, navigate to settings >> comments
and next to comments field choose Hide, then scroll down and click Save Settings
Step 2. Generate your Facebook App ID.
now you should generate your own facebook app id, it’s really easy and one step process,
just go to this page, facebook developers
then click + Set Up New Application
enter your application name, ( you can type any name )
and check agree and click Create Application
then click on Connect tab (on the left tabs-list) or see the next image.
facebook comments box for blogger
and fill the following info.
Connect URL : Enter your blog url and you must enter it with an ending dash. (for example: http://myblogname.blogspot.com/) .
Base Domain you must type blogspot.com
then click strong>agree and click Save Changes
on the next page facebook will generate you alot of info. you’ll need only one line, it’s App ID:
just copy it and keep any where, we’ll need it in the next steps. please see the following image to see where you’ll find your facebook App ID:.
facebook comments box for blogger
Step 3. Codes To Add To Your Template.
you must add the following codes to your blogger template to ensure that the comments box will work for your blog in the right way.
and in this step we’ll add the following codes,
  • xmlns attribute
  • SDK script
  • Open Graph protocol tags

  • Adding the xmlns attribute :
please go to your blogger account again, and navigate to, layout >> edit html >> and check Expand Widget Templates
then find the following code,
<html
you’ll find it on the top of your code. second or third line, and after it add the following code,
xmlns:fb='http://www.facebook.com/2008/fbml'
you must type a space before it and after it,
here is an example.
<html  xmlns:fb='http://www.facebook.com/2008/fbml'  expr:dir='data:blog..............2005/gml/expr'  >
  • Adding the SDK script Code :
search for
<body>
and after it add the following code,
<div id="fb-root"></div>
<script>
    window.fbAsyncInit = function() {
    FB.init({
      appId  : 'YOUR   APP ID',
      status : true, // check login status
        cookie : true, // enable cookies to allow the server to access the   session
      xfbml  : true  // parse XFBML
    });
  };

    (function() {
    var e = document.createElement('script');
      e.src = document.location.protocol +   '//connect.facebook.net/en_US/all.js';
    e.async = true;
      document.getElementById('fb-root').appendChild(e);
    }());
</script>
but please don’t forget to change YOUR APP ID to your app id ( you got it in the previous step ).
  • Adding the Open Graph protocol tags:
copy the following code.

<b:if cond='data:blog.pageType == &quot;item&quot;'>
<meta   expr:content='data:blog.pageTitle' property='og:title'/>
<meta   expr:content='data:blog.url' property='og:url'/>
<b:else/>
<meta   expr:content='data:blog.title' property='og:title'/>
<meta   expr:content='data:blog.homepageUrl' property='og:url'/>
</b:if>
<meta   content='MY-SITE-NAME' property='og:site_name'/>
<meta   content='http://google.com/help/hc/images/logos/blogger_logo.gif'   property='og:image'/>
<meta content='YOUR-APP-ID'   property='fb:app_id'/>
<meta content='YOUR-FACEBOOK-PROFILE-ID'   property='fb:admins'/>
<meta content='article'   property='og:type'/>
and change the colored text to the following,
Change MY-SITE-NAME with the one you want to appear when a user likes a page. (Gil likes Helping on Facebook)
Changehttp://google.com/…/blogger_logo.gif with your blog logo, or remove the all tag if you don’t want it.
Change YOUR-APP-ID with your application ID number.
Change YOUR-FACEBOOK-PROFILE-ID with your own facebook user profile ID.
after making this changes add the above code just before
</head>
now we finished adding the facebook codes to your template, please don’t touch anything and continue to the next step.
Step 5. Adding the Comments Box to your blogger template.
please find the following code.

<data:post.body/>
 
and after it, please paste one of the following codes.
For Light Comments box ( like the one in the demo )

<b:if cond='data:blog.pageType == &quot;item&quot;'>
<p align='left'><img alt='' class='icon-action' height='51' src='https://blogger.googleusercontent.com/img/b/R29vZ2xl/AVvXsEi7U4Xi-Bqmwi55bYUnj4o4muCkN82hmfp6ewfVO61fZTVjE_8fwp8I3SkzwCGYssa9Dp7cGzTo8l9U_gdsMNlhooeO4CYJJDYDQhfav-IyksVvHtw3cI7TAlkrzKql6fGEWvj4qTO7cIk/' width='331'/></p>

<script src='http://connect.facebook.net/en_US/all.js#xfbml=1'/>
<div><fb:comments width='450' expr:title='data:post.title' expr:href='data:post.url'   expr:xid='data:post.id'/></div>
<div style='background-color: #f2f2f2;border: solid 1px #cccccc; font-size:10px; padding:3px;width:100%;'> <img alt='' class='icon-action' height='16' src='http://allblogtools.com/imgup/1-2010/allblogtools-blogger-templa.gif' width='16'/> <b><a href='http://www.allblogtools.com/' target='_blank' title='blogger templates'>AllBlogToolsFacebook comments for blogger</a>  brought to you by <a href='http://www.allblogtools.com/' target='_blank' title='blogger templates'>AllBlogTools.com , Get Yours?</a></b></div>
</b:if>

For Dark Comments box ( If you prefer to display the comments box in a dark colors. )

<data:post.body/>
 
and after it, please paste one of the following codes.
For Light Comments box ( like the one in the demo )

<b:if cond='data:blog.pageType == &quot;item&quot;'>
<p align='left'><img alt='' class='icon-action' height='51' src='https://blogger.googleusercontent.com/img/b/R29vZ2xl/AVvXsEi7U4Xi-Bqmwi55bYUnj4o4muCkN82hmfp6ewfVO61fZTVjE_8fwp8I3SkzwCGYssa9Dp7cGzTo8l9U_gdsMNlhooeO4CYJJDYDQhfav-IyksVvHtw3cI7TAlkrzKql6fGEWvj4qTO7cIk/' width='331'/></p>

<script src='http://connect.facebook.net/en_US/all.js#xfbml=1'/>
<div><fb:comments width='450' expr:title='data:post.title' expr:href='data:post.url' colorscheme='dark' expr:xid='data:post.id'/></div>
<div style='background-color: #f2f2f2;border: solid 1px #cccccc; font-size:10px; padding:3px;width:100%;'> <img alt='' class='icon-action' height='16' src='http://allblogtools.com/imgup/1-2010/allblogtools-blogger-templa.gif' width='16'/> <b><a href='http://www.allblogtools.com/' target='_blank' title='blogger templates'>AllBlogToolsFacebook comments for blogger</a>  brought to you by <a href='http://www.allblogtools.com/' target='_blank' title='blogger templates'>AllBlogTools.com , Get Yours?</a></b></div>
</b:if>

To change the width of your comments box, please change 450 to what ever you want, it’s in pixels,
and now please click Save Template , then check your blog. i wish it looks great and works perfectly.
Read more ...

Google Transliteration API In Regional Language Blogger Blogs -How to

How to Use Google Transliteration Api In Regional Language Blogger Blogs

What is Transliteration ?
Transliteration is the process of phonetically converting a word written in one script into another. Transliteration should not be confused with translation, which involves a change in language while preserving meaning. With transliteration, it is the sound of the words that are converted from one alphabet to the other.

The majority of blogs are in English.Though there are many regional languages spoken but there are a few blogs published in regional languages. The main reason being the unavailability of editors for regional languages.

Blogger Platform is available in almost all Languages. But is not available to Write or Commenting in regional language for visiters.
This plugin offers language transliteration for visitors to Comment or to Write in regional language

The Transliteration API currently supports transliteration from the English version to the scripts of the following languages:
Amharic, Arabic, Bengali, Greek, Gujarati, Hindi, Kannada, Malayalam, Marathi, Nepali, Persian, Punjabi, Russian, Sanskrit, Serbian, Tamil, Telugu, Tigrinya and Urdu.

Here is an Example of Textarea to Write Hindi

Type in Hindi (Press Ctrl+g to toggle between English and Hindi)


How to Add this Transliteration Text Box to Blogger?
There are two steps
a.Adding Script Code
b.Adding Html Code

Adding Script Code
1. Go to Blogger Dashboard > Design > Edit HTML
2. Tick on Expand Widgets Check box
3. Find </head> tag and place Bellow Code before It!
<script src="https://www.google.com/jsapi" type="text/javascript">
</script>
<script type="text/javascript">
    google.load("elements", "1", {
        packages: "transliteration"
    });

    function onLoad() {
        var options = {
            sourceLanguage: google.elements.transliteration.LanguageCode.ENGLISH,
            destinationLanguage: [google.elements.transliteration.LanguageCode.HINDI],
            shortcutKey: 'ctrl+g',
            transliterationEnabled: true
        };

    };
    var control = new google.elements.transliteration.TransliterationControl(options);
    control.makeTransliteratable(['transliterateTextarea']);
    }
    google.setOnLoadCallback(onLoad);
</script>

Change Destination language code 'HINDI' with yours and it must be in Block Letters

Available Languages :-
AMHARIC
ARABIC
BENGALI
GREEK
GUJARATI
HINDI
KANNADA
MALAYALAM
MARATHI
NEPALI
PERSIAN
PUNJABI
RUSSIAN
SANSKRIT
SERBIAN
TAMIL
TELUGU
TIGRINYA
URDU


Adding HTML Code
This is a HTML code, and you can add this that where it you want (i.e in Sidebar, in Contact Form, Or in above Comment Form etc,.)
<div class="Google-transliterate-Way2blogging">
    Type in Hindi (Press Ctrl+g to toggle between English and Hindi)<br>
    <textarea id="transliterateTextarea" style="width:600px;height:200px"></textarea>
<span style="font-weight:bold;font-size:10px;float:right;margin:5px;"><a href="templates-widgets.blogspot.com/">+Grab this</a></span>
</div>


How to add this Text Box Above Blogger Comment Form?
1. Search bellow two tags
<b:if cond='data:post.embedCommentForm'>
<b:include data='post' name='comment-form'/>
2. In between these two tags Put above HTML Code that i am given.

Thats all! 
Do u like it.than share it
Read more ...

FireFox Addons to Help Affiliate Marketers

The power to augment your browsing experience with tools that will make you more productive is priceless, especially for an affiliate marketer. Capturing key data via your browser instead of having to use multiple external tools will definitely save you time. Below we have compiled a list of Firefox add-ons that will come in handy for any affiliate marketer.

1. See Page Ranks While You Browse

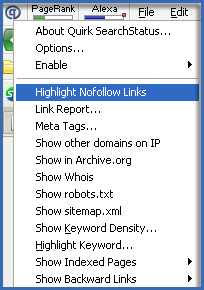
While there are a few addons that display Google PageRank for the current page, Search Status can be considered the best one for a number of reasons:
  • It display the Google PageRank, Alexa rank, Compete ranking and SEOmoz Linkscape mozRank (you can disable any of the metrics)
  • Its position in the browser can be customized in plenty of ways (it is always important if you have multiple addons and want to position them properly);
  • It has quite a few other handy tools including link nofollow attribute display; link report; etc):
SearchStatus

2. See Which Country the Site Is Based On

If you are considering a merchant or a program, you want to instantly see which country it comes from. This will save your time immensely by allowing you to instantly filter out programs from the countries you don't want to (or can't) deal with.
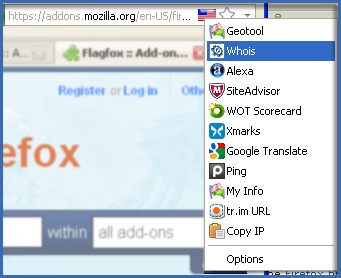
Flagfox displays a country flag depicting the location of the current website's server and provides a multitude of other useful tools such as site safety checks (this one is run by Site Advisor), whois look-up and translation (based on Google Translate):
FlagFox

3. Get Warned of Suspicious Sites

Like the above one, this addon will help you stay away from shady merchants and suspicious programs.
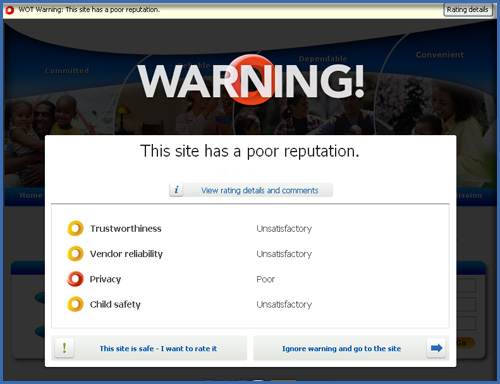
MyWot is the community-based safe surfing tool that rates all sites based on the complex combination of metrics and scores:
  • Trustworthiness: A poor rating may indicate identity theft potential, Internet scams, credit card fraud, phishing, lottery scams, viruses, adware, or spyware.
  • Vendor reliability: A poor rating indicates possible fraud or a bad shopping experience.
  • Privacy: A poor rating indicates spam, adware, or spyware.
  • Child safety: A poor rating indicates the presence of age-inappropriate material (content that is sexually oriented, hateful, or violent in nature).
My WOT

4. Run Keyword Research

Most of affiliate niche sites rely on search referral traffic. This is why it so important to know what people search for when looking for something related to the site topic. Thus doing keyword research prior to (and while) creating content for your affiliate site is so essential.
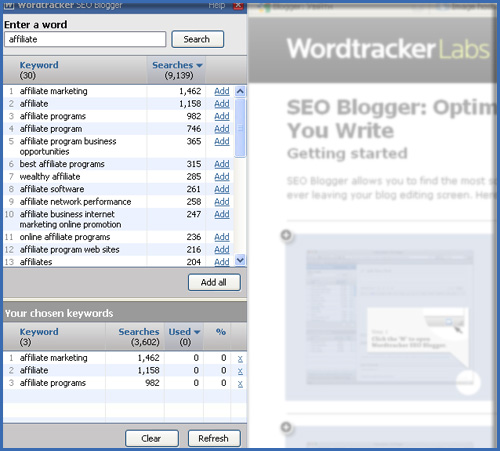
SEO Blogger allows you to find the most sought-after keywords for your topic without ever leaving your blog editing screen. The tool opens in a handy sidebar so it will never interrupt your content creation process:
SEO Blogger

5. Easier Optimize and Analyze

While the previous addon helps you create an optimized content, this one lets you see how well you have done your job.
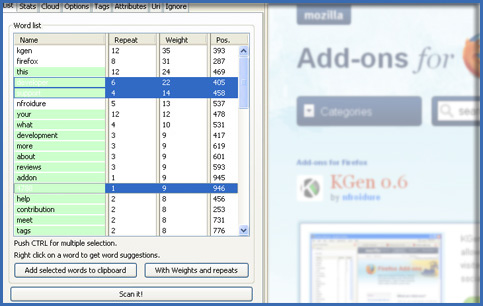
"KGen" (Keyword Generator) is a FireFox addon that allows you to see what keywords are strong on the current web page:
Keywird Generator

6. Quickly Check Where Your Affiliate Site Ranks

Now that you have optimized your content for some important words and analyzed the word prominence, you can hope for some high rankings for your pages. SEOBook Rank Checker will help you check how well your pages are doing in Google:
  • Check multiple pages and multiple keywords;
  • See the actual page ranked;
  • Export results to a CSV file or save the results for future reference:
Rank checker

7. See How You Are Being Tracked

Seeing which tracking software the current site is using is useful in a number of ways: first, it (indirectly) tells you how trustworthy the site is (for example, it may warn you about some potential traffic leak by showing that the merchant's site is using AdSense). Besides, this also broadens your outlook by letting you know how others track and analyze traffic.
Ghostery is a FireFox plugin that is aimed to do the following:
  • It detects “web bugs, ad networks and widgets” on every page on the web;
  • It allows to block any detected web bugs trackers and thus protect your privacy.
Ghostery

8. Convert Currencies Easier

Currency converter is a handy FireFox addon that will turn particularly handy for non-US affiliates who promote American merchants. It will help them quickly estimate their earnings as well as get around unknown currencies.
The addon has quite a few useful options:
  • Customize the settings based on your location;
  • Track the conversion you make: access daily, weekly, monthly, and annual charts depicting the historical exchange trends of the currency pair that you selected;
  • Save your last conversion and use those FROM and TO parameters for your next conversion request so that you don’t need to make the same selections each time.
Currency converter

9. Create Your Affiliate Links Faster (Amazon)

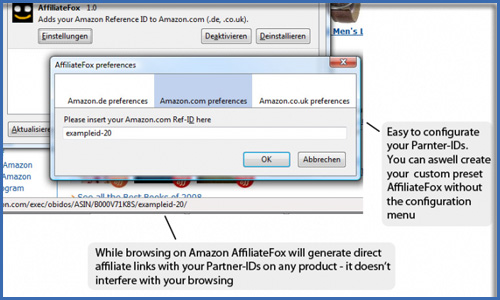
AffiliateFox adds your Amazon Reference ID to Amazon.com thus allowing to easier generate deep links to your browser Address Bar - just copy and paste and you are done!
AffiliateFox

10. Tweet Your Affiliate Links Easiar

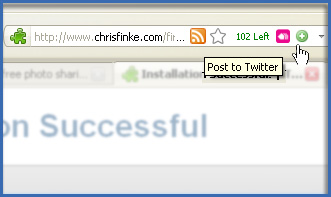
This one is great to use in combination with the previous addon: first generate your affiliate link to your address bar and then Tweet right from there! TwitterBar allows to post to Twitter from your address bar.
Note: you don't want to Tweet your affiliate links to often to make sure your Twitter stream is relevant and spam-free!
TwitterBar
Read more ...

Add Website Speed Test Tool Directly on Your Website

How To Add Website Speed Test Tool Directly on Your Website
1.Login to your blogger Dashboard and go to Desing --> Page Elements.

2.Click on 'Add a Gadget' on the sidebar.

3.Select 'HTML/Javascript' and add the one of code given below


<!-- iWEBTOOL - www.iwebtool.com - Website Speed Test -->
<form method="get" name="pageform" action="http://www.iwebtool.com/tool/tools/speed_test/speed_test.php"  target="pageframe" onsubmit="return validate(this);">
<table border="0" style="border-collapse: collapse" width="100%">
<tr>
<td height="91" valign="top">
<table class="tooltop" style="border-collapse: collapse" width="100%" height="76">
<tr>
<td>
<table border="0" style="border-collapse: collapse" width="100%" cellspacing="5">
<tr>
<td valign="top" colspan="5"><b><font size="2">Your domain(s): </font></b><font size="1">Enter each address on a new line (Maximum 10)</font></td>
</tr>
<tr>
<td valign="top" colspan="4">
<textarea rows="11" name="domain" style="width: 100%"></textarea></td>
<td >
&nbsp;</td>
</tr>
<tr>
<td >
<input type="submit" value="Check!" style="float: left"></td>
<td >
<font size="1">(eg. iwebtool.com)</font></td>
<td >
&nbsp;</td>
<td colspan="2">&nbsp;</td>
</tr>
</table>
</td>
</tr>
</table>
</td>
</tr>
<tr>
<td >
<iframe name="pageframe" width="100%" height="251" class="toolbot" frameborder="0">
</iframe></td>
</tr>
<tr>
<td height="39">
&nbsp;</td>
</tr>
</table>
</form>
<script language="JavaScript">
function validate(theform) {
if (theform.domain.value == "") { alert("No domain provided"); return false; }
return true;
}
</script>
<p><a href="http://www.iwebtool.com/" target="_blank"><font size=1>Powered by iWEBTOOL</font></a></p>
<!-- iWEBTOOL - www.iwebtool.com - Website Speed Test -->


Look at the Result below


Your domain(s): Enter each address on a new line (Maximum 10)


(eg.templates-widgets.blogspot.com)


Powered by iWEBTOOL


4. Now Click On Save 'JavaScript' You are done.

Cheers
Read more ...

Attractive Feedburner Email Subscription box for blogger

Email Subsciption Box

<!-- Email subsciption box -->
<form id="subscribe" action="http://feedburner.google.com/fb/a/mailverify" method="post" target="popupwindow" onsubmit="window.open('http://feedburner.google.com/fb/a/mailverify?uri=Your-FeedBurner-Feed ', 'popupwindow', 'scrollbars=yes,width=550,height=520');return true"><b>Like This Blog's Posts?</b> Get the Latest of It Directly from your Inbox for Free - Enjoy your Day!<br />
<div style="text-align:center">
<input type="text" value="Enter your email address..." id="subbox" onfocus="if (this.value == &#39;Enter your email address...&#39;) {this.value = &#39;&#39;;}" onblur="if (this.value == &#39;&#39;) {this.value = &#39;Enter your email address...&#39;;}" name="email" style="width:250px;" />
<input type="hidden" value="Your-FeedBurner-Feed " name="uri" />
<input type="hidden" name="loc" value="en_US" />
<input type="submit" value="OK" id="subbutton" />
</div></form>

<div>
<center>
<table>
<tr> <td>
<a href="http://feeds.feedburner.com/Your-FeedBurner-Feed "><img src="http://feeds.feedburner.com/~fc/Your-FeedBurner-Feed ?bg=99CCFF&amp;fg=111111&amp;anim=1" height="26" width="88" style="border:0" alt="" /></a>
</td><td>
<script type="text/javascript" language="JavaScript" src="http://twittercounter.com/embed/Your-Twitter-User-Name/111111/99CCFF"></script>
</td></tr>
</table></center>
</div>

<div style="padding-left:10px;">
<table>
<tr><td><a href="http://feeds.feedburner.com/Your-FeedBurner-Feed " target="_blank" title="Subscribe To The Latest Posts"><img style="float:left; margin-right:5px; width:20px; height:20px;" src="http://img243.imageshack.us/img243/2619/10rssicon.png" /></a><a href="http://feeds.feedburner.com/Your-FeedBurner-Feed " target="_blank" title="Subscribe To The Latest Posts">Subscribe to The RSS Feed</a>
</td></tr>
<tr><td>
<a href="Your-Facebook-Page-Url" target="_blank" title="Facebook time"><img style="float:left; margin-right:5px; width:20px; height:20px;" src="http://img163.imageshack.us/img163/8637/10facebookicon.png" /></a>
<a href="Your-Facebook-Page-Url" target="_blank" title="Facebook time">Connect via Facebook</a>
</td></tr>
<tr><td>
<a href="http://twitter.com/Your-Twitter-User-Name" target="_blank" title="Twitter time"><img style="float:left; margin-right:5px; width:20px; height:20px;" src="http://img189.imageshack.us/img189/6853/10twittericon.png" /></a><a href="http://twitter.com/Your-Twitter-User-Name" target="_blank" title="Twitter time">Follow Us on Twitter</a>
</td></tr>
</table></div>

Add  feedburner email subscription box in blogger blog.

Hi friends now add this wall effect feedburner subscription box in your blogger blog with great Social network.


Follow simple step to adding this box in your blog ---->>>>>

* First go to your blogger Dashboard.

* Now click in Design tab and you are here--->>> Add new element.

* Now click in Add Gadget which is in your sidebar.

* When open new window click in HTML/javascript .

* When open new blank box copy below code and paste in blank box.


<h2>Dont Miss Another Post Connect With Us !</h2>

<center>
<form action='ADD HERE YOUR FEEDBURNER EMAIL URL' id='subscribe' method='post' onsubmit='window.open('ADD HERE YOUR FEEDBURNER EMAIL URL', 'popupwindow', 'scrollbars=yes,width=550,height=520');return true' target='popupwindow'><p> 
</p><b>Get The Latest Full Posts By Email - It's Free</b><br/><input id='subbox' name='email' onblur='if (this.value == '') {this.value = 'enter your email address';}' onfocus='if (this.value == 'enter your email address') {this.value = '';}' style='width:230px;' 
type='text' value='enter your email address'/> 
<input name='uri' type='hidden' value='blogger toolz'/> 
<input name='loc' type='hidden' value='en_us'/> 

<input id='subbutton' type='submit' value='go'/>


<p><a href='YOUR FEEDBURNER URL'><img alt='' height='26' src='ADD HERE YOUR CHICKLET BUTTON SOURCE URL'/></a></p>
<ul>
<a href='YOUR FEEDBURNER URL' target='_blank'><img alt='feedburner' height='70' src='http://santabanta.mywapblog.com/files/rss1.png' style='background:transparent;border:none;' title='subscribe to rss feed' width='70'/></a>
<a href='YOUR FACEBOOK URL' target='_blank'><img alt='facebook' height='70' src='http://santabanta.mywapblog.com/files/fb1.png' style='background:transparent;border:none;' title='find us on facebook' width='70'/></a>
<a href='YOUR TWITTER URL' target='_blank'><img alt='twitter' height='70' src='http://santabanta.mywapblog.com/files/twitter1.png' style='background:transparent;border:none;' title='follow me on twitter' width='70'/></a>
</ul>
<br/>
<div style='background: transparent url(http://4.bp.blogspot.com/_4hkuhiry_2u/tgkypieu5ai/aaaaaaaaboc/_zpvocmyhmq/post+line-1.png) no-repeat scroll center top; height: 2px; overflow: auto;'>
</div>
<div class='post-footer'>
<div class='postbox' style='padding-left:15px;color:#1b5983;background:transparent url() repeat scroll left top;line-height:20px;'>
</div>
<div style='clear: both;'></div></div></form></center>

NOTE:- Change Highlighted text in above code with your own if you have any problem comment so i will solve ok. Dont forget to leave comments

Add feed special feedburner widget box in your blogger blog.

Hi this is very effective and special feedburner email subscription box for your blogger blog add this now.


Follow simple and easy step to adding this widget box in your blogger Sidebar now--->>>>>

* First go to your blogger Dashboard.

* Now click in design tab and edit HTML.

* Now click in small box to expand your blogger template.

* Find this code ]]</b:skin> by CTRL+F key easily.

* Copy below code and paste before ]]</b:skin>

.subsboxfull{width:230px;padding-top:20px;padding-right:20px;padding-bottom:30px;padding-left:10px;color:#333;height:100px;border:1px solid #353434;background:transparent url() top center no-repeat;margin-bottom:0}
.rss-boxicon{background:url(https://blogger.googleusercontent.com/img/b/R29vZ2xl/AVvXsEikzxhi64mWOMwDrkpTrZc43hU34xyjd3jH9zSjxCLdl0BrmYEvpVae1Nrm9J5OgaVxc7YFE_UXrRvKdUFnFr1bXYmsT9BzxeTmXo-UFZn148gM2Td-JwG6tnhK_vZgdiVNr-bkpZOsO7Y/) left no-repeat;padding-left:20px;margin-right:1em;font-weight:bold}
.email-boxicon{background:url(https://blogger.googleusercontent.com/img/b/R29vZ2xl/AVvXsEicpSJAwDZS0oX33u1SrW-fu3Hj6awvwxQR40ydJF8r1lAKoQ8hKF1C8i9fQ8-XwaOzrtXSlqIXQid-U2lek9kk5GuhUo9YYFI9u_8RxUKwEx2SZYZAVjk49DR1nxZf8F8hmYS6GGGnRUM/s1600/email-box.png) left no-repeat;padding-left:20px;font-weight:bold}


* Now save your blogger template.

* Again go to your blogger DASHBOARD.

* Now click in design tab and you are here--->>> Add new element.

* Click in add Gadget which is in sidebar and when open new window Click in HTML/javascript from list.

* When open new blank box copy below code and paste in blank box.

<div class='widget-content'>
<div class='subsboxfull'>

<a href='your-twitter-url' rel='nofollow' target='_blank' title='twitter'><img src="https://blogger.googleusercontent.com/img/b/R29vZ2xl/AVvXsEg2fHBQ0VM4PglvHzEKAmt_hVSInzQ2j08yakF8s1FrkTfWxPZpkOO7mVpryoVxFmp6haY_BmF8vm9ivAmrtm8XFzhE14iooaoeTRKBd8rX77SVBqTYXG7I6aSU_CBWHJD_mt3puldtr8U/" /></a>

<a href='your-facebook-url' rel='nofollow' target='_blank' title='facebook'><img src="https://blogger.googleusercontent.com/img/b/R29vZ2xl/AVvXsEhfelPkHd786Cu2iNAdKXiNeomEglQ39WyRbIojB38VqQaZD55PogM3lDJQNLMkXTj_nx-HX81P29hok4HNpiliYdlyKrYnt1XxBsIJaK4s9L9_szhMgJXqlzqg_YLZCAAJfCpph5FTsZs/s1600/facebook--box.png" /></a>

<a href='your-delicious-url' rel='nofollow' target='_blank' title='delicious'><img src="https://blogger.googleusercontent.com/img/b/R29vZ2xl/AVvXsEhy5rZ5zJ5-F4MF8CRc8znBnJe17iNNvjBoQ_zuRCpJzpNgFzTVHjKBdgIzqxRYkz36tZRpvOcmgUGVbHTBd7NJijHVdAlzpvLP2RocdlgNr6wBj0bY8QixVw47iICE9LCZAcfUPemvqFQ/s1600/delicious-box.png" /></a>

<a href='your-stumbleupon-url' rel='nofollow' target='_blank' title='stumbleupon'><img src="https://blogger.googleusercontent.com/img/b/R29vZ2xl/AVvXsEg-4HUWe22x5lOgI7g3-2OJ9O0jorn8U9DDmpqwV9L9KMz9MS5uDIDV-PWGColBeStlNHeYEpZjMQzLqPwHfBFcRj1tPhhu_UwP_Q6_osjwUZPSjEMk7pf5VkplDeVO5bK4MB7x1tc6H1k/" /></a>

<a href='your-linkedin-url' title='linkedin'><img src="https://blogger.googleusercontent.com/img/b/R29vZ2xl/AVvXsEigaXcghiAA1fZ3trgDlKSMEPumOgtGAJwM2mnm_ITkpa72DUTuPa5ODagN8gVNazHR1yyJV60xIBj9WIxlfFAZjn8yca4-Y2tki6BsIir_dt7JmnL1LZyepAHXxjKEDlFLEqmnUX4uyNM/" /></a>

<a href='your-contact-url' title='contact'><img src="https://blogger.googleusercontent.com/img/b/R29vZ2xl/AVvXsEhI9iJxOFPmzZf7BHLbzkFRZJ6LVVmSHXA__Ee4INdOMUWI474YJRGzbxh-ouN1W0yWui8KfRRgn_0gTLCZyO2vOWVlH5M__S6h_d8_Npk82VVxK2vSSYzjliRmAlozLJIEsT32DgMmIw0/" /></a>


<form action='YOUR FEEDBURNER EMAIL URL' method='post' onsubmit='window.open(\'YOUR FEEDBURNER EMAIL URL', \'popupwindow\', \'scrollbars=yes,width=550,height=520\');return true' target='popupwindow'><p><input name="email" style="width:230px; border: 1px solid #ccc; padding: 5px;" type="text" value="Enter your email address" /></p><input name="uri" type="hidden" /><input name="loc" type="hidden" value="en_US" /></form>

<p><span><a class='rss-boxicon' href='YOUR FEEDBURNER URL' rel='nofollow' target='_blank'>RSS</a></span>
<span><a class='email-boxicon' href='YOUR FEEDBURNER EMAIL URL' rel='nofollow' target='_blank'>Email</a><span><span style="float:right;"><a href='YOUR FEEDBURNER URL' rel='nofollow'><img alt="" height="26" src="YOUR FEEDBURNER FEED COUNTER CHICKLET SOURCE URL" /></a></span></span></span></p>

</div>
</div>
<div class='clear'></div>

NOTE:- Now change Highlighted Text in above code with your own if you any problem ask me.


Read more ...

Add facebook like button to blog

few days ago, face book surprised us by launching a lot of social plugins, one of them, actually the most popular one yet is the famous like button,
In this tutorial you’ll learn how to add it to your blogger blog.
and you’ll learn how to customize
  • change the verb, like or recommend.
  • change it’s color.
  • change it’s font.
Step 1. adding it to your template.
The button code,

<b:if cond='data:blog.pageType == &quot;item&quot;'>
<iframe allowTransparency='true' expr:src='&quot;http://www.facebook.com/plugins/like.php?href=&quot; + data:post.url + &quot;&amp;layout=standard&amp;show_faces=false&amp;width=100&amp;action=like&amp;font=arial&amp;colorscheme=light&quot;' frameborder='0' scrolling='no' style='border:none; overflow:hidden; width:450px; height:40px;'/>
</b:if>
 
where to add it ?
Log into your blogger account, then go to Layout >> Edit Html.

Before doing any thing you must check Expand Widget Templates box.
And find the next Code

<div class='post-header-line-1'/>
 
And after it, paste your button code

What, If you didn’t find the code above in your template, The try to find the following,

<data:post.body/>
 
And paste the button code Before it.
click Save Template and you are done.
Step 2. Customize your button & Demo.
in the above code you can customize 3 parts. and i’ve colored them to make it easy for you to recognize,
in the above code change the following parts,
  • like this part controls the verb that appear on your button, keep it as you see or change it to recommend if you want.
  • arial this part controls the font type, keep it or change it to one of the following, lucida+grande
    segoe+ui
    tahoma
    trebuchet+ms
    verdana
  • light this part controls your button color theme, and you have three options, light, evil, or dark
  • Update, How to make it appear on your home page.
in the button code there are two parts you’ll need to remove to make this button appear on your home page, the first line and the last line, if you still don’t under stand, please see the following parts and delete it before pasting the code to your template,

<b:if cond='data:blog.pageType == &quot;item&quot;'>
</b:if>
 
I wish you all like it and please leave your comments if you need any help,
Read more ...

GOOGLE SEO TOOLS |FOR BLOG/WEBSITE

SEO, or search engine optimization, is an important and essential for the success of a website. Done properly, SEO can improve both the volume or quality of traffic to the website from search engines via “natural” or un-paid (“organic” or “algorithmic”) search results.

Google, been the most popular search engine in the world, provides lots of tools and services to publishers, advertisers, webmasters, bloggers and etc. All these tools are meant for various seemingly unrelated purposes. While not explicitly marks as online SEO tools, when these Google online tools been used together, these free services from Google can provide formidable and valuable information, statistics and suggestions to optimize a web page or web site for higher search engine results ranking position (SERP).
Here’s the list of 10 Google SEO tools, all of them free.
  1. Google Webmaster Tools – Google Webmaster Tools provides publishers with detailed reports about web pages’ visibility on Google, such as indexing status, internal and external pages that link to the site, Google search queries that drive traffic to the site, crawl errors, and many other features and tips which allows webmasters to improve the site, such as using robots.txt, sitemaps, and preferred domain.
  2. Google Analytics – Essentially a web traffic tracking and analytic tool that generates detailed statistics about the visitors to a website. With Google Analytics data, publishers can make decisions on what’s the popular contents to publish.
  3. Google Traffic Estimator – A tool for Google AdWords advertisers, but the Google Traffic Estimator can be used to get an idea how popular or how many page views will be the content that based on certain keywords, topics or phrases.
  4. Google Keyword Tool – Another tool for Google AdWords advertisers, which can be used to get new keyword ideas to generate the content, or put in the best words inside the articles to attract more visitors via search engine.
  5. Google Search-based Keyword Tool – Another Google AdWords tool which can be used to find and generate keyword and landing page ideas highly relevant and specific to the website, based on actual Google search queries.
  6. Google Website Optimizer – A free website testing and optimization tool, which can be used to find out what site content and designs which best resonates with the visitors, by letting Website Optimizer to show different versions of website to visitors while tracking the performance of each version.
  7. Google Zeitgeist – Follow the trend is not only applicable as investment strategy, publishers can get idea for new content based on trending subjects or topics too. Google Zeitgeist lists most popular, fastest rising and fastest falling search terms and keywords for the past years.
  8. Google Trends – If past data of Google Zeitgeist is not meaningful for SEO, Google Trends allows user to view and compare the how often (up to 5) keywords or terms are been searched on Google over time, how frequently the topics have appeared in Google News stories, and in which geographic regions people have searched for them most.
  9. Google Insights for Search – With Google Insights for Search, which is essentially advanced version of Google Trends, users can compare search volume patterns for a phrase, word or terms across specific regions, categories, time frames and properties, regardless of popularity.
  10. Trends for Websites – Google Trends for website traffic data, which displays visitors and ranking by region, related sites visited and related keywords or terms searched. Important to get a knowledge of competitors.
  11. Hot Trends (Searches) – For publishers who want to jump on the bandwagon on what’s happening right now, Hot Trends 批top 40 fastest-rising search queries right now, updated continuously throughout the day.
  12. Google Ad Planner: A media management tool for website advertisers and publishers, but potentially provide valuable information on own and competitors’ websites, with statistical profile on information such as traffic statistics, visitor demographics, visitors interests, related sites, keywords search for, daily unique visitors and etc.
  13. Google PageRank via Google Toolbar – Google PageRank represents the relative importance of the web pages on the Internet, which also represent quantity and quality of backlinks made to the web page. PageRank values help authors to determine which subjects are likely to success to attract attentions of others.
  14. Google Related Links – Not exactly a SEO tool, but the Related Links gadget helps webmasters to retain visitors on the websites, reduce bounce rate and increase page views on their sites.
  15. Search Engine Optimization Starter Guide – A guide on SEO from Google, in PDF format.
share your thouhts ...question bellow....

Read more ...

Add Reply to comment Tag To Comments| blogger

One of the options the default blogger comments lack is the option to reply to an individual comment.In fact it was one of the reasons i changed from blogger comments to Disqus comments.I have however come across a cool blogger hack that will enable comment replies for blogger.

With a small piece of code your comments will include a reply option.This cool tutorial was originally posted on thisischen.com.

ScreenShot :

comment tip blogger


You can see a quick demo of the effect on this blog : Demo Blog - Comment replies

This is a really helpful blogger trick and you have have the comment reply option on your blog in just three steps !

Adding Comment Replies To Blogger

Step 1. In your dashboard Click 'Layout' > 'Edit Html'> Tick the 'Expand Widget templates' box


Blogger layout

edit html blogger

Expand widget templates blogger


Step 2. Find the following code in your blogs Html :
(Click Ctrl and F for a search bar to help find the code - More Info)

<data:commentPostedByMsg/>

Step 3. Paste the following code Directly Below/After <data:commentPostedByMsg/>

<span class='comment-reply'><a expr:href='&quot;https://www.blogger.com/comment.g?blogID=YOUR-BLOG-ID&amp;postID=&quot; + data:post.id + &quot;&amp;isPopup=true&amp;postBody=%40%3C%61%20%68%72%65%66%3D%22%23&quot; + data:comment.anchorName + &quot;%22%3E&quot; + data:comment.author + &quot;%3C%2F%61%3E#form&quot;' onclick='javascript:window.open(this.href, &quot;bloggerPopup&quot;, &quot;toolbar=0,location=0,statusbar=1,menubar=0,scrollbars=yes,width=400,height=450&quot;); return false;'>[Reply to comment]</a></span>


Edits : You must make one change to the code - In order for the gadget to display the posts for your blog you must add your blogger I.D.

To find your Blogger I.D. simply go to your layout page, posting page or any of the pages you access from your dashboard and copy your I.D. from the address bar at the top of the page.

Your Blog I.D. is a the number that appears in the URL - This is how your I.D. will be displayed :

Find your blogger i.d.


Info

Once you have your blog I.D. added save your template and the comment replies have been added.

If you need more help just ask, have you added the reply option ?
Read more ...

Facebook Widgets and Tools for Your Website and Blog

Facebook is the largest social networking site with more than 400 million active users and is growing larger every day! Make sure to use these Facebook widgets to connect with your large Facebook audience through your blog or website. You can use these tools to easily share certain profile information, websites, blogs, and businesses with the Facebook community.


Personal Profile Widgets
Profile Badge
Create a Facebook profile badge to share selected profile information on your website. A profile badge will allow your users to easily connect with you and add you as a friend.

Photo Badge
This photo badge allows you to share your Facebook photos on websites and blogs. Choose from a vertical, horizontal, or two-column layout and also choose the number of photos to be displayed.

Fan Badge
Display your Facebook fan pages for all to see.


Website or Business Widgets
Share Button
A powerful facebook widget which allows your visitors to share your content on Facebook!

Fan Box
Lets your users easily become a fan of your site and also allows them to view your Facebook page stream.

Page Badge
Lets you share your Facebook page (one that you have created) information on your website.

Twitter Link
Connect your Facebook page with Twitter. Whenever you update your Facebook fan page your twitter followers will be updated as well with a tweet.


Developers Widgets
Publishing to Facebook
This allows your users to publish their content and activity to Facebook.

Comments Box
Lets your users comment on your website content with their Facebook account. 

Live Stream
Lets Facebook users to post and share content in real-time.


so how is this facebook widgets ?you like it?any problem while using it.?feel free to comment below.
Read more ...

Add Heart Social Bookmark Icons to Blogger Post

1.Log in to your dashboard--> layout- -> Edit HTML

2.Click on "Expand Widget Templates"

3.Scroll down to where you see this:

Heart Social Bookmark Button Below Blogger Post

<data:post.body/>


4.Copy below code and paste it immediately after the line <p><data:post.body/></p> .

<div style='clear:both; '>
<div style='width:65px; float:left;'>
<a expr:href='&quot;http://www.stumbleupon.com/submit?url=&quot; + data:post.url + &quot;&amp;title=&quot; + data:post.title' rel='external nofollow' target='_blank'><img alt='Stumble' src='https://blogger.googleusercontent.com/img/b/R29vZ2xl/AVvXsEjqjbLiqARqfYuhjwpiFhoErxKvESCJwT4DUnnHtzuAXIjkRPhrI8BtbeKJIDUEQ4PcWLdRKBHpCbpqFtEgkwULHoZMQO-5ImEYgUPyJiuMWiaKrrrrmmYjusO96b4Yl6IFSYrD0bEk-UIa/' style='padding:0;margin:0;border:none;'/></a>
</div>
<div style='width:65px; float:left;'>
<a expr:href='&quot;http://del.icio.us/post?url=&quot; + data:post.url + &quot;&amp;title=&quot; + data:post.title' rel='external nofollow' target='_blank'><img alt='Delicious' src='https://blogger.googleusercontent.com/img/b/R29vZ2xl/AVvXsEgpX9WXBeAowcgx-zyZIKdRwIMgBW5EG53UvTvc2ZtDcd9ESkLtT4QDu0IaGgKY5CAlZDVZqr7qknFpHCcCzs2bEc1Yjmi24D3IYQOLPbIzmnsk3Jeyge57JEW-shg3zgumR2Mzep1feTjT/' style='padding:0;margin:0;border:none;'/></a>
</div>
<div style='width:65px; float:left;'>
<a expr:href='&quot;http://technorati.com/faves?add=&quot; + data:post.url' rel='external nofollow' target='_blank'><img alt='Technorati' src='https://blogger.googleusercontent.com/img/b/R29vZ2xl/AVvXsEiSereDkqyudAzeGq_7uF8fdjH_NHcDYfd2k6NtP0UCkZv3osYeRYIfETCKDvPV4AVnzLzerZmYUPqZnFUDynd4gGaRwdW6sTasDPG_u7OLnnedKEB9qMTPA5-_LVJfa9Jh7XdDpyzfdN7i/' style='padding:0;margin:0;border:none;'/></a>
</div>
<div style='width:65px; float:left;'>
<a expr:href='&quot;http://twitthis.com/twit?url=&quot; + data:post.url' rel='external nofollow' target='_blank'><img alt='Twitter' src='https://blogger.googleusercontent.com/img/b/R29vZ2xl/AVvXsEh6Tnq8M6aTkdpBaS0XDfta6vWH9nCytEpiwc25L2H9WYbQS7NLEEsjNXlRyI5PHPY5fFyzGAXDAbq8bkKuq6FcakC6KZf6324WcItBY93rCtnaDsyRQkRHHd0FfdtoCRRxJYyuW_UUrpu4/' style='padding:0;margin:0;border:none;'/></a>
</div>
<div style='width:65px; float:left;'>
<a expr:href='&quot;http://www.facebook.com/sharer.php?u=&quot; + data:post.url + &quot;&amp;t=&quot; + data:post.title' rel='external nofollow' target='_blank'><img alt='Facebook' src='https://blogger.googleusercontent.com/img/b/R29vZ2xl/AVvXsEhqC9PePR7v0Y0zXw2ppxQXGT-hzMNP1q3kbKjrZENBEPtYm_4p_ia22U5i0oWUcdbxNFOX5SUgaG0TpAQDDXzlUvu6VpcYPltVDy83951-aDRjjeefCOY4YZmCMQcny3VaQ4jnBml7hu4O/' style='padding:0;margin:0;border:none;'/></a>
</div>
<div style='width:65px; float:left;'>
<a expr:href='&quot;http://myweb2.search.yahoo.com/myresults/bookmarklet?u=&quot; + data:post.url +  &quot;&amp;=&quot; + data:post.title' rel='external nofollow' target='_blank'><img alt='Yahoo' src='https://blogger.googleusercontent.com/img/b/R29vZ2xl/AVvXsEj1JruQ8Zj0j3VTfyNXS5SiNa7BFL4TjnTfi7LNONhNVFJdfmKnVJWgjMw9kXDnzi1Sm-OZ2QoHPvMSFcCsWD1IgWT_WBRh7KPXt37iI_W5wc9l79i5ZJXDIjWPvnLcvymJtzyWcfXVKI2u/' style='padding:0;margin:0;border:none;'/></a>
</div>
<div style='width:65px; float:left;'>
<a expr:href='&quot;http://reddit.com/submit?&amp;url=&quot; + data:post.url + &quot;&amp;title=&quot; + data:post.title' rel='nofollow' target='_blank'><img alt='Reddit' src='https://blogger.googleusercontent.com/img/b/R29vZ2xl/AVvXsEiNLIarpAC4O2h8a5y49liMX4_Z60HvAiZFBbBDrfL481_I1PvX9QyKI-jBUK3ndxhqOboIgBowJsWMz-qC57uBbSC0O3NJOX2zgp9ZP3wWj8-lC1hRESXNy8VTpS-Y2W3Z0eYhYKrdn8Lz/' style='padding:0;margin:0;border:none;'/></a>
</div>
<div style='width:65px; float:left;'>
<a expr:href='data:blog.homepageUrl + &quot;feeds/posts/default&quot;' rel='external nofollow' target='_blank'><img alt='Feed' src='https://blogger.googleusercontent.com/img/b/R29vZ2xl/AVvXsEh_1uMNX9T1boutSvJSuaFyzdBD8Dm-xMaozRIm0qyN4XBr4BlCMA6jfcLMMThKHMAG8GKFFXWsumdRyp5VqFrPrmD0xkWKsx0c-Rw9bYpJ88t1FgejnFKH73GWihdvRNu0eat_58n3EqRZ/' style='padding:0;margin:0;border:none;'/></a>
</div>
</div>


5.Click on "Save Templates" and now you are done.
Demo
any problem while adding Heart Social Bookmark Icons to Blogger Post??plz leave comments below
Read more ...

Adding Posts Slider To Blogger Blog

If you see the header section of this blog, you will see a jQuery Posts Slider. Check the pic below.

jQuery Post Slider


This slider which is also called Featured Content Slider was used in the Zinmag Primus Wordpress Template which was converted to Blogger by Falconhive. Using this Featured Content Slider you can display Featured Blogposts in the slider. You can check the Demo

The posts slider is very useful as we can show our blog visitors some of our best blog posts without them having to search it. This even makes our blog look more professional. Adding this slider to our blog isnt that tough, but it may require some trial and error pasting of some code depending on your blog template. But even that isnt difficult.

Before we start our work I recommend that you backup your blogger template incase something horrible happens to your blog template.

NOTE: There was some problem with the earlier script and it stopped working. I have replaced the script and its working fine now. If you have already added this slider to your template and are facing problem with the slider, then please change the script in the template with the new one given below

First we start with the CSS part of the template. Copy the following code and paste it anywhere between <b:skin> and </b:skin>


#slider {
background:url(http://i39.tinypic.com/a2bzhd.png);
height: 254px;
width: 983px;
overflow: hidden;
position: relative;
margin: 5px 0;
}


#mover {
width: auto;
position:absolute;
overflow:hidden;
}


.slide {
padding: 20px 0px;
width: 1000px;
float: left;
position: relative;
height:200px;
}


.slide h2 {
font-family:georgia, Helvetica, Sans-Serif;
font-size: 24px;
position: absolute;
top: 20px;
left: 1px;
color: #ac0000;
padding:0px 0px 0px 30px;
margin:0px 0px;
width:500px;
overflow:hidden;
}


.slide h2 a:link, .slide h2 a:visited {
color:#fff;
background-color: transparent;
}


.slide h2 a:hover {
color: #ddd;
background-color: transparent;
}


.slide p {
color: #999;
position: absolute;
top: 100px;
left: 1px;
font-size: 12px;
font-family:georgia, Helvetica, Sans-Serif;
line-height: 20px;
width: 500px;
padding:0px 0px 0px 30px;
margin:0px 0px;
}


.slide img {
position: absolute;
top: 20px;
left: 577px;
background:#fff;
padding:10px 10px;
}


#slider-stopper {
position: absolute;
font-family: Georgia, Helvetica, Sans-Serif;
top: 113px;
right: 55px;
color: #AC0000;
padding: 3px 8px;
font-size: 14px;
text-transform: uppercase;
z-index: 1000;
}

Now that you have pasted the CSS part, paste the given code between ]]></b:skin> and </head>


<script src='http://bloggerjavascripteffect.googlecode.com/files/primus-jquery-1.2.6.min.js' type='text/javascript'></script>
<script src='http://bloggerjavascripteffect.googlecode.com/files/primus-slider.js' type='text/javascript'></script>


Now comes the tricky part which will require some trial and error pasting. Search </head> in the template and you will have to paste the following code somewhere below it. As every template is different from the other, I cant tell you the exact location to paste the code.

But I guess that everyone wants to put the posts slider in the header part. So search for <div id='header-wrapper'> or <div id='header-wrap'> or <div id='header'> or something that is similar to the three examples that I have given. All you have to do is paste the code somewhere near them and save the template. If the end result isnt what you want, again go to the template and paste the code at a different place. Copy the code given below


<!-- Slider -->
<div id='slider'>
<div id='mover'>


<div class='slide'>
<h2><a href='http://www.cooltricksntips.com' title='Cool Tricks N Tips '>Post Slider By Cool Tricks N Tips </a></h2>
<p>If you liked this tutorial then please Subscribe to Our Feeds and dont forget to share it on Digg/Stumble Upon/Twitter</p>
<img alt='Cool Tricks N Tips' src='Image URL'/>
</div>


<div class='slide'>
<h2><a href='Post URL' title='Post Title '>Post Title </a></h2>
<p>Post Description</p>
<img alt='image name' src='Image URL'/>
</div>


<div class='slide'>
<h2><a href='Post URL' title='Post Title '>Post Title </a></h2>
<p>Post Description</p>
<img alt='image name' src='Image URL'/>
</div>


<div class='slide'>
<h2><a href='Post URL' title='Post Title '>Post Title </a></h2>
<p>Post Description</p>
<img alt='image name' src='Image URL'/>
</div>


</div>
<!-- /Mover -->
</div>
<!-- /Slider -->

Now its time for you to put your favourite posts in the Posts Slider. If there are some alignment problems with the Post Title or Image or the Stop Button in the slider then dont worry, continue doing what I say. Search <!-- Slider --> in the blog template. Below it you will see


<div class='slide'>
<h2><a href='Post URL' title='Post Title '>Post Title </a></h2>
<p>Post Description</p>
<img alt='image name' src='Image URL'/>
</div>

Just replace Post URL, Post Title, Post Description, image name and Image URL with the information about your blog post. By default there are 4 such blocks for adding your blog post in the Posts Slider with the 1st block having information about Cool Tricks N Tips. Just replace it with info about your blog post.

If you want more than 4 or less than 4 posts in the posts slider add or remove the code given above depending on what you want.

After you have done everything as I have given, there are some instructions for you.
In the CSS code given above I have highlighted the background image of the Slider in red colour. Please copy the image to your computer and host it on your own.

Now check your blog. If everything is working properly, stop here. You dont have to read the part given below. But if there is any problem with the Slider, then Continue Reading the post.

Just below the highlighted image in CSS part, I have even highlighted the width option. There are chances that the image may be big for your blog template and isnt appearing properly. So change the number of pixels accordingly so that the slider appears properly.

To calculate the pixel width and height properly, first install Adobe Air on your computer and then install Pixus.

Now, there may be a chance that the alignment of the Post Title, Summary, Image or the Stop button isnt proper. For that read the information given below.

If you are having problem with the placement of the Image, search .slide img { in the template. The code will be as shown below


.slide img {
position: absolute;
top: 20px;
left: 577px;
background:#fff;
padding:10px 10px;
}

Adding A jQuery Posts Slider To Blogger Blog

To change the alignment of the image, change the values highlighted in red colour. The value 20 indicates 20 pixels from the top of the image and 577 indicates 577 pixels from left side of the image. Use Pixus to measure the values.

If you are facing any problem with alignment of Post Title, search .slide h2 { and change the top and left values as I have shown for the Image.
For alignment problem with Post Summary search .slide p { and change the values
For alignment problem with the Stop Button search #slider-stopper { and change the values.

Thats it, now save the template and refresh your blog to see the Posts Slider working properly for your blog.

now what u think of this widgets..is it cool????u like or not??/any help needed just leave a comments bellow...plz
Read more ...
Designed By GP